Showing posts with label Iterative Saves. Show all posts

Monday, January 28, 2019

1596 - Archangel XII


Today's version of the Archangel Gabriel features some fine-lined detail work: refining the border edges and placing the shaft of the weapon.  

In the upper left corner, you might make out the brand for Wild-Heerbrugg.  They used to make precision instruments, but went out of business decades ago.  The black case holds a ruling pen set that my Father gave me; it was his set when he was a draughtsman back in the 1950's or '60's.  Ruling pens are a style of steel pen nib, the sort that you dip in liquid ink.  The nibs are adjustable by screw so that you can achieve different line thicknesses.  I really should feature this set on JSVB someday, it's very special.

This was my first time using these ruling pens.  I know you should load them with ink, but thinned acrylic paint works nearly as well.  I discovered that these pens create lines from hairline at the thickest down to atomic at the thinnest.  It was crazy how thin the lines were, I had never seen anything like it before.  By comparison, drawing with a modern ruling pen like the one I typically use for setting down haloes is like using a houspainter's brush.  Nobody seems to make precision ruling pens anymore, so using my Dad's old set was marvelous.  


Monday, January 21, 2019

1593- Archangel XI


Just working to smooth out the colours and fix a few details.  The icon progresses. 


Monday, January 14, 2019

1590 - Archangel X


The Archangel Gabriel now has eyeballs.  With this, the icon stares back as I work on it.  


Monday, January 7, 2019

1585 - Archangel IX


Work on my icon is slow.  When is it ever fast?  I've added more pigment to the skin tones, rounding them out, but they are now too hot looking.  More for me to fix next time, I guess.


Sunday, December 23, 2018

1580 - Archangel VIII


When a bell rings, an angel gets his wings.  "It's A Wonderful Life" (1946) is one of my least favourite motion pictures of all time.  I will grant that it is handsomely produced, it's simply not at all to my taste.

Fortunately for me, I was able to complete the wings on my angel without having to screen that film.  


Saturday, December 15, 2018

1578 - Archangel VII


Continuing to triptych the light fantastic.  Oh, what a rotten pun.  But this angel is taking shape.  The colours aren't right yet, but the basic shapes seem to be correct.


Tuesday, November 20, 2018

1568 - Archangel VI


I've focused om rendering garments.  Although the colours are different, the folds of the cloth in this angel are as similar as I can make them to those of my previous angel.  The shapes should be mirror images.  


Friday, November 16, 2018

1566 - Archangel V


Today's progress on my icon acts as a cautionary reminder for every artist always to bring all of your art supplies to work with you!!  I forgot most of my brushes and visual references, so as a result all I could complete was monkey work and the things I could do by memory alone.  

"Monkey work" is just the process of laying down boring, low-skill paint strokes.  It helps to colour inside the lines, though.


Wednesday, November 14, 2018

1564 - Archangel IV


Here's progress on my archangel icon.  Ooh, it's kind of reddish, isn't it?  Maybe this angel is embarrassed that I am taking so long to finish.  Also: the underpainting tends to be dark and rough-looking.


Sunday, October 7, 2018

1558 - Archangel III


I decided on the colours for the new angel: dark green and rose gold.  The armour will be silver.  I've started painting in the face.  It looks like a mask now: successive layers of thin paint will blend the colours. 


Thursday, September 27, 2018

1556 - Archangel II


Progress on the archangel: look!  The gilding is solid, mostly.  You can see nicks and loose bits, but those places will be covered in pain and won't be seen.  I've also blocked in some basic colours and filled in the sanquir, which represents the darkest shadow of the skin tone.  I call it The Green Blob. 


Wednesday, September 26, 2018

1555 - Hockey Puck Project I

On the hottest day of summer, the most Canadian thing I have even encountered happened to me.  The neighbour's kid was going door-to-door selling used hockey pucks.  

It was above 40° outside, so the boy was roasting.  I don't know where he managed to get them, but he had his little red wagon filled with hockey pucks, maybe a couple hundred or so.  Quite a few of them looked like game pucks or souvenirs, and some I believe were tournament pucks.  He was selling them on the street to make money to buy ice cream.  I bought a couple of pucks that I thought were nifty. 

Then I saw he had two or three dozen blank pucks.  I doubted anyone would buy those.  A flash of insight led me to purchase all of the blanks: what if I painted artwork on them?  The value added should no doubt fetch a high price.  So, I'm going to paint hockey pucks, and the boy and I can sell them and we will split the profits.  I figure custom-painted hockey pucks will be popular at Christmas!  


Intuition assured me that a regulation hockey puck would fit precisely within a Mason jar lid.  I think I may have even saw this in a dream.  I tested out my theory, and the fit is exact.  I am using the inside rim of the lid to draw the outer edge of the paintable area of each puck.  It's easier than using a compass.


I'm painting the pucks with gesso, since gesso sticks to most surfaces and itself provides primer for acrylic paint.  I'll fill in the circles with white gesso and sand them smooth. 


Monday, September 24, 2018

1553 - Archangel I


It's icon time again!  And, if you've followed JSVB, you will recognize it's yet another archangel.  I'm not even going to bother naming this one until the end, but this one is Gabriel.  

The only reason this angel is Gabriel is because I wrote (painted) another icon exactly like it but as a mirror image.  The steps I will follow to create this icon I hope will be exactly like the ones I employed to create its mate, Michael (mis-labelled as Gabriel all last year in JSVB). I'll change this icon's robe colour, perhaps. 

As Star Trek proves, Gabriel (Lorca) and Michael (Burnham) are largely interchangeable.  They just use different colour schemes.   

Despite the ragged look of the gold, the gilding went well.  The gold needs to be brushed - carefully and gently! - and sealed.  


Monday, September 17, 2018

1550 - Varnished Truths


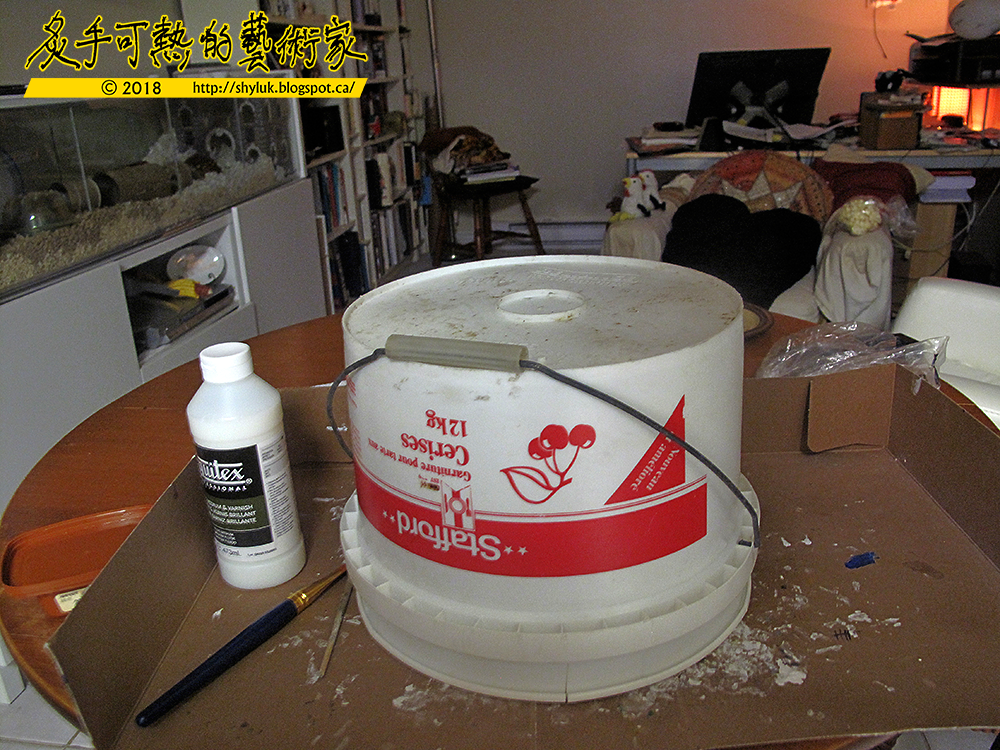
So this is the varnishing process.  Varnish acts like a magnet to airborne debris like dust and hair, so the artwork should be hermetically sealed for as long as possible until the varnish dries.  The result is an hours-long meditation on what it takes to eat twelve kilograms of cherries.  I doubt that I have eaten a single kilogram of cherries in my lifetime, I don't like them very much.  The pail came from a restaurant dumpster, I think, or was given to me empty.  Right now beneath the upended pail are the globes with still-wet varnish.  The varnish will seal the artwork for posterity and freshen the colours.  Since I am using glossy varnish, it will also balance the parts where the labels were too shiny.

Liquitex again.  The reason I am gravitating to Liquitex is that the local art store runs out of Golden and the other product lines.  I really should get up earlier in the morning before all that is left on the shelves is Liquitex.

The Liquitex varnish is okay.  As a big plus, it doesn't need to be mixed or thinned.  Having to do mixing means there's a chance of introducing air bubbles into the varnish which can be nearly impossible to dissolve.  This varnish also goes on in thin layers.  For flat artwork, you'd want a thick varnish so that you only need to apply it once and it dries flat and smooth.  Thin varnish shows brush strokes, but on the other hand it dries much faster and it won't run along non-flat surfaces (globes consist entirely of non-flat surfaces).  So, thin varnish needs multiple applications.  Liquitex gets cloudy the more layers you add, so there's an upper limit as to how much varnish I can use.  After I lift the cherry bucket in a few hours, we'll know how the final result looks!  


Sunday, September 16, 2018

1549 - Bespoke Worlds: Krypton IV


Krypton, labelled.  Just as with Mongo, applying the labels was a huge pain in the rear end.  At least I learned my lesson about using dark pigments. 

The Dandahu Ocean was crossed by Superman's long-lost ancestor Val-El who voyaged from the ancient city of Erkol to discover the new world continent of Lurvan via the Red Ocean.  Along the way, Val-El encountered Vathlo, the island of highly-advanced black citizens of Krypton. 

The final step is to varnish the globe, which will make the whole world glossy and vivid, and also balance out the not-so-shiny areas.


Monday, September 3, 2018

1544 - Bespoke Worlds: Krypton III


Since the Planet Krypton explodes in the very first panel of the first Superman comic, Superman himself remains ignorant of his own heritage.  As Superman comics mature, they do add some backstory for The Man Of Steel.  Literal bits and pieces of Superman's home planet reach Earth, providing plot developments and exotic Kryptonian characters, some who are villains and some who remain allies.  

In September of 1981, DC Comics published The Krypton Chronicles, which was an attempt to codify history of life on Krypton from the point of view of Superman and his ancestors.  From a very practical standpoint, The Krypton Chronicles represented a change in DC's comic book format, adding a single sheet of paper into the comics, which when folded allowed for two more pages of artwork and two more pages of advertising as well as the excuse to bump up the retail price of the book by 20%.  Since a page of artwork takes around a day to produce, the deadlines for the comic books became that much tighter.  At least in the Krypton Chronicles, the art for the two new pages was as cheap as anything I've ever seen, and must have been rushed at top speed to completion. 

Still, what readers got was interesting lore, even if it was somewhat unformed: brief glossary terms for the Kryptonian language and a sketch map of the planet drawn by Albert de Guzman.  This map seems to have been the basis for other maps and comics that followed.

The Krypton Chronicles are available to read online, which helped me greatly in my research for this globe.  The story is a batty mix of science, history, mysticism, and prophecy that seem to borrow heavily from Christian Bible stories and Robert Louis Stevenson.  The de Guzman map shows all of the places mentioned in the Chronicles.  However, the map itself is drawn very simply onto two circles to represent the planetary hemispheres.  As a result of this haphazard projection, much is made later on of the split between Krypton's Old World and New World hemispheres.  

The progress of the El family, (Jor-El, Kal-El, Val-El, etc.) charts the progress of Superman's ancestors as they discovered new scientific and theological advances in the Old World. They migrated to the New World to populate an unexplored continent after a catastrophe appears to destroy the old one.  Since the El family are among the most honorable of the Kryptonians, several splinter colonies are created by dissidents who do not agree with the Els, including The Island Of Thieves which split from the main expedition.  Those who reject Kryptonian  orthodoxy tend to remain on the Old World hemisphere while the right-thinkers congregate on the New World hemisphere as close to Kryptonopolis as possible.  Renegades who no longer serve the plotline are doomed to explore the Valley of Juru, where no-one who visits it escapes with their lives.  

Creating a globe eliminates the hemispheric divide of the de Guzman map.  Correcting the faults in the map projection shows that the Old World and New World continents are not far apart, and that Val-El's eastward journey across the Dandahu Ocean would have been much shorter had he not detoured to see Vathlo, the island sanctuary of Krypton's highly-advanced black people, and then subesquently sailed into a vortex storm.  

As far as my artwork is concerned, I've coloured in the oceans and the continents.  In the picture above, you can see the Red Ocean.  To the east are the large mountain ranges: The Jewel Mountains, the Gold Volcano, and the strikingly obvious Magnetic Mountain.  I was tempted to put a real magnet in there.   


Saturday, September 1, 2018

1543 - Bespoke Worlds: Krypton II


The Planet Krypton I think has more water than the Planet Mongo.  It's a wetter world.  Practically speaking, Krypton is very much wetter.  Since I've taken care to put extra gesso on this globe, it also takes longer to dry and for it to be workable.  

Learning from the lessons of Mongo, I've decided to make Krypton's colour palette considerably lighter.  This will make for a more cartoony-loking world, which will please my client.  However the lighter pigments I use cover the white gesso poorly, so I have to use more coats of paint, and you guessed it: drying time is thus multiplied.  Lots of opportunity to snap pictures of my progress while I wait for the next layer of paint to dry - this is what you see in today's JSVB post.

Why is there red paint in my palette while the water is all blue?  Because Krypton has a Red Ocean.  Krypton and Mongo both have features that are a lot like Earth, but are somehow dialled up a bit to make them more exotic or romantic.  We have a Red Sea, the Kryptonians had a Red Ocean.  The Red Ocean is on the New World Continent Lurvan, on the far side of the planet, whereas we are looking at the Old World Continent, Urrika. The water in Urrika is The Boiling Ocean, which as far as I know is the only inland body of water on either Krypton or Mongo.  Not many lakeshore condos on either world. 


Friday, August 24, 2018

1540 - Bespoke Worlds: Mongo VI


The Planet Mongo is nearly finished.  I've added the labels, which was a big deal.  

So now with Mongo essentially complete, I can look back and see where things need to be improved.  Everything seems to hinge on the quality of the labels, yet the labels turned out differently than I had expected.  

I elected to use waterslide decals, which are similar to those temporary tattoos that kids like.  You print the decal, wet it, and then the wet decal glues itself to the target surface.  The decals that I chose seem to glue themselves right way, not leaving any chance to alter the positioning once stuck.  That made the work quite a bit harder.

Plan A was to print the decals in colour with my Canon bubblejet.  When I did that, the colours all ran off the decals, despite sealing them with acrylic fixative.   

Plan B was to print the decals with my HP laserprinter.  This worked, but I can only print the type in black.  

Plan C was to hand-paint the lettering, but the globe is small and it was super finicky to transfer the text (I shade the back of the text with chalk and then trace out the lettering so that the chalk is transferred to the surface of the globe).  It worked, but it was hard to control the chalk.  

So, Plan D was to lighten up some parts of the globe so that the lettering would at least be visible if not readable.  

If you look closely at the globe, you can see that the decals are shiny where I was expecting them to be matte.  The final step of the globe will be to varnish it.  This might be difficult since varnish should dry flat, and that the curvature of the globe will likely make it drip..  However, the varnish should cover the gloss of the decals with more gloss.  

Lessons learned for Krypton, my next planet:  I won't use dark colours, so that I can use black-lettered text.  I'll also use more acrylic medium so that I can make finer lines with the paint.  That will also affect gloss, so the final test will be to see how well these globes take to being varnished.


Saturday, August 18, 2018

1539 - Bespoke Worlds: Mongo V


Less is more, perhaps.  I need to remember that this project is experimental, and with trial and error there are bound to be mistakes.  

On the plus end of the scale, I restored the colour of the ocean, adding some nice cartoony swirls.  Oceans should always swirl on globes, I think.  On the minus end of things I forgot that globes never dry flat, so a fair amount of the wet ocean migrated from the northern hemisphere onto the southern continents where it pooled and dried all over Tropica, The Great Mongo Desert and Naquk.  I spent the day repairing the flood. 

My next intention was to line the continents with gold, which you can see above.  I'm used to using the gold pigment from Golden Acyrlics (a bit of co-incidence in the name), but at the art store I got sweet-talked into buying Liquitex.  Liquitex is cheaper than Golden by a few dollars, and it looks better.  Unfortunately, I discovered that it doesn't flow better.  I must have done something wrong because the paint would form gelatinous lumps when thinned.  The thin paint was too thin, and the lumps were too thick albeit they were usable.  I should have remembered to use acrylic medium which is the translucent liquid part of acrylic paint that binds the pigment.  Medium is cheap and easy to find at any art store. 

Painting with thick gold paint yielded thick lines.  The effect is unsubtle, especially on these small globes.  On a larger globe, there would be no problem.  I spent some of the day thinning out the more obvious lines, but I'm not going to go over the entire globe with this fix.    

The next step, again highly experimental, will be to create labels to put text on the globe.  I really hope it works! 


Wednesday, August 15, 2018

1538 - Bespoke Worlds: Mongo IV


Pushing hard, I filled in most of the continental detail in one day.  I feel I still have to blend and balance the colours a little before I add the final details.  Also, I had a good colour for the ocean but now I am unsatisfied with it, so I will work on that was well.  

From here you can see the blood red westerly coastline of Mingo Bay, future home of Mingo City, nestled between the two mountain ranges.  To the east are the lands ruled by Flash Gordon, the city of Syk and the endless tunnels of the cave badlands.  To the far east, you can see the dreaded Fire Plains and the glow of Mongo's fearsome volcanoes.